This article is the beginning of a series of posts that describes WebAssembly(WASM), the importance of this technology, and a simple ClojureScript example running WASM. On completion, the reader should understand the basic concepts related to this topic, will know the importance of WASM in the actual web, and will be capable of running a simple application using ClojureScript|WAT|WASM.
The traditional web
The majority of the web is running using the traditional architecture, by traditional we mean a web browser sending requests to a server via http/s. This web browser uses HTML and CSS to render content and delegate to JavaScript the responsibility to manage the behavior of these components and the interaction between the browser and the internet via the request-response life cycle. That’s it, plain and simple.
So, this scenario is working at the moment. What is the problem?
The problems with the traditional web are the limitations of the browser as interpreter/compiler(Depending on the technology implemented by the browser) and renderer at the same time. In general, the performance of JavaScript running resource-intensive applications like video editors, 3D games, and so on, can’t compete with the native performance. Remember JavaScript was designed for humans and contains rules and redundancy that must be checked by the browser to run the source code.
How to solve this problem?
One of the many solutions for this problem could be the inclusion of a new lower-level format with a compact binary format to run alongside JavaScript. In this way, we could use this language to develop near-native performance features.
WebAssembly, time to rise!
Having these ideas in mind, WebAssembly(a.k.a WASM) was launched in 2017 as a binary instruction format for a stack-based virtual machine. We know this definition is almost the same shown at webassembly.org so lets extend a little bit more this explanation. Let’s start with binary instruction format, this one is simple because it represents the way WASM exposes instructions to the computer to be processed. On the other hand, we have a stack-based virtual machine which stores the instructions from WASM files in memory using a stack as the main structure(We will talk more about this later in this post). Now that we are understanding a little bit more about the concept of WebAssembly, so let’s continue with the goals and benefits this technology brings to us.
Main goals of WebAssembly
Like any other technology on the web, WebAssembly has been created with some specific goals in mind. We are presenting these goals as follows:
Security: WebAssembly provides a secure sandboxed virtual machine. This means that we can use WASM code from any web application without thinking about intrusions into our personal computers or servers. Proof of this point is that some of the most used browsers on the web have its support enabled by default because they are confident about the security provided by WASM.
Fast execution: WASM is compiled into a binary format that will be executed at a low level. In this way, we will deliver near-native performance execution times. The format used by WASM is very compact so the browser can parse it as fast as possible. The translation of a WebAsembly module to native code can be cached by the browser. In this way, the next time we load a page that contains a module, there will be virtually no load time.
Portability: Three of the promises of WASM are Hardware/Language/Platform independence. This principle implies portability for these three different factors. In the example presented in this post, we are generating a module made with wat2wasm tool in one folder of our system. Then we can use the same *.wasm file in our ClojureScript project without any problem at all. A valuable note for the reader could be a list of different languages that compile to WebAssembly, if you want this resource, please go to this link.
The future!
WebAssembly is one of the most exciting technologies to learn on the web at the moment and the main reason for this is the bigger ambition around being an alternative output format for any compiler that targets native code. Another aspect to take into consideration is that WASM is already integrated with a greater part of the web. So, it is a natural chain reaction to use JavaScript and WebAssembly modules in conjunction. In this way, we can empower JavaScript with cross-compiled features from native code and get results as if it were part of the browser itself. Big projects such as Figma, Lichess, Jitsi, and a other ones are using WASM for interesting use cases. So it’s a great opportunity to learn about this technology and adopt it if we have any use case to be solved with it.
How WebAssembly works?
We have already given you a brief description of multiple aspects around WebAssembly, now we will explain how it works. First, we will introduce the general process describing any step of the development life cycle. After this explanation, we will show you all the development life cycle using two different practical examples:
- Using wat => WASM, we will write some code using a textual representation named wat and will compile it to WASM.
- Using Rust => WASM, we will write some code using Rust and will compile to WASM as well. This part will be covered in the next post because we will solve a more difficult problem.
General development life-cycle
The development life-cycle for any WASM application follows a common set of steps. In the following lines, we will mention and explain every step of this process.
- Source code implementation: For the implementation of the source code we can select any language that will be available to compile to WASM.
- Compilation phase: We will compile the source code to WASM using a compiler such as Emscripten or Cheerp.
- Execution phase: The execution phase will run wasm extension files as binaries.
Time to practice!
We presented you with a brief introduction to WebAssembly, how it works, and the general development life cycle. Now it’s time to apply all this stuff in practice. Let’s start with our first example: Wat to WASM!
Wat to WASM!
In this example, we will be using the WASM textual representation known as Wat. With this format, the code can be read by humans but it’s not the best option for larger applications. With this example, we want to show you that WASM applications could be made even without a sophisticated setup or any famous programming language existent out there.
Setup
First of all, we will need CMake because it is a pre-requisite to install The WebAssembly Binary Toolkit or WABT. In macOS is easy to install, we just need to run brew install cmake and wait for the installation to be completed. In Linux CMake probably will exist in many different package managers so it could be something like sudo apt-get install cmake for Debian/Ubuntu users or the substitution of apt-get by any of your package managers. For Windows users, please follow these instructions. After the installation of CMake, we will need to install The WebAssembly Binary Toolkit or WABT. To do this, we need to clone the git repository using the following commands:
git clone --recursive https://github.com/WebAssembly/wabtcd wabtgit submodule update --initWABT needs to use several submodules for some tests, that’s the reason we are initializing and updating the submodules.
Now, we need to run the following instructions to build WABT:
mkdir buildcd buildcmake ..cmake .
After this step we recommend you to add the route for the bin folder to the $PATH, in this way you don’t have to put the complete path to bin folder every time you want to execute any of the WABT commands.
The code!
Perfect, we have completed the setup, so now it’s time to create our first .wat file, compile it to a .wasm file, and call it from ClojureScript. First of all, create a project folder using the following command: mkdir my_first_project or you can use your favorite editor for this purpose as well. Inside this folder we need to create a wat file using our editor or this command: touch calc.wat In this file, we will create a simple calculator with only one operation, addition. Open the calc.wat file in your favorite editor and paste or write the following code:
(module
  (func $add (param $a i32) (param $b i32) (result i32)
    local.get $a
    local.get $b
    i32.add)
  (export "add" (func $add)))
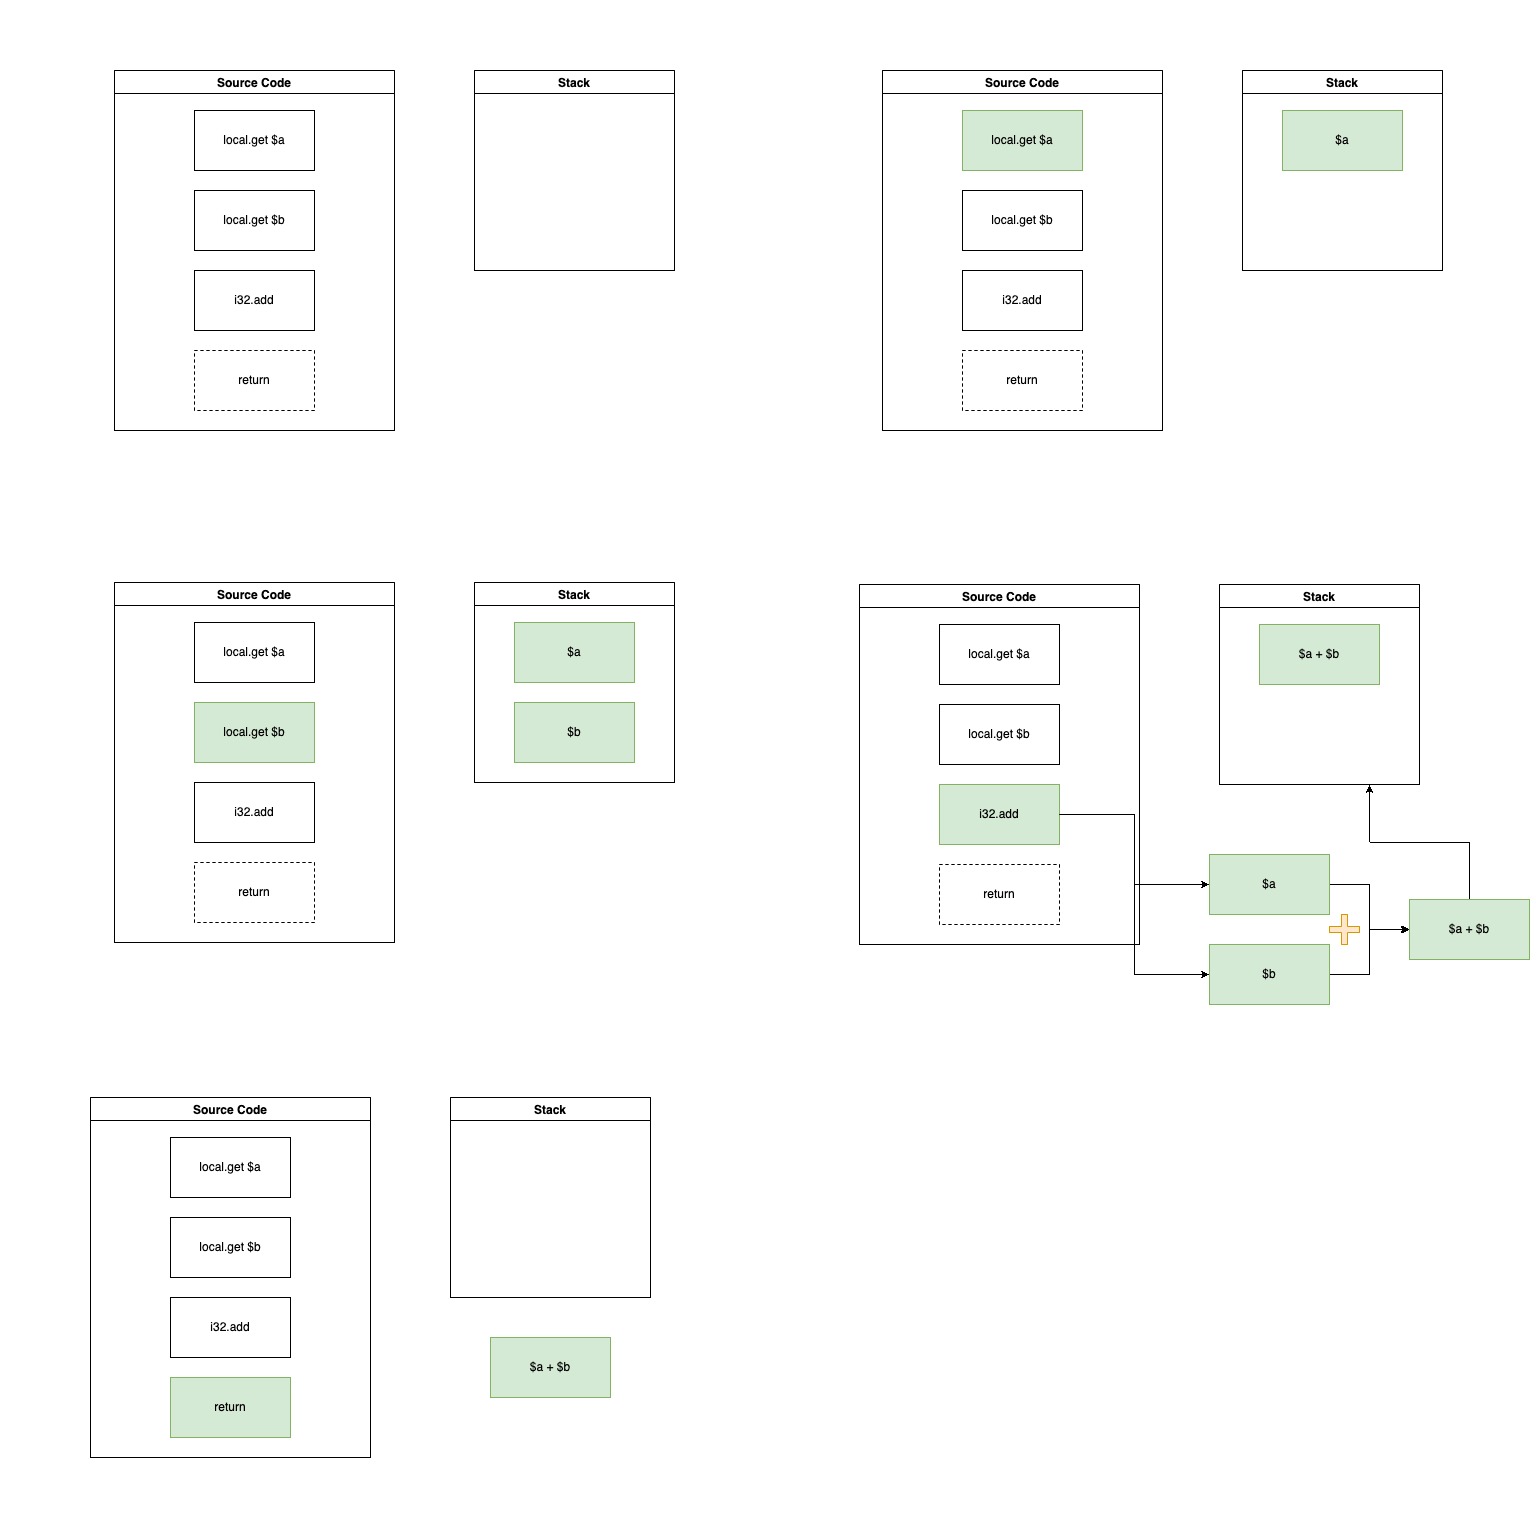
This code is pretty simple, it takes two parameters a and b, and calculates the sum of these values. But don’t drink too much Kool-Aid, we have to remember WASM as a stack-based virtual machine. With this idea in mind, we can describe the behavior of this operation in more details:
- We have the module expression that contains the definition of the elements that belong to a specific module.
- We are defining a function using the func expression. In this case, we have a function named add(The $add expression is more complex but keep this simple at the moment).
- We are defining some parameters for the function already defined using param expression. This parameters have defined types, i32 for this particular case.
- We are using the result expression to define the return type of the function.
- local.get x takes a value and pushes it to our stack
- We use i32.add to calculate the addition of the two elements extracted from the top of the stack and put the result at the top of the stack.
- We are exporting our function(Making it callable from external sources) using the export expression
- In the following animation we can see how the add operation is working in WASM:

After completing this phase, the next one will be compiling to wasm format. For this purpose we use the following command: wat2wasm calc.wat -o calc.wasm Here wat2wasm takes the .wat file to compile and uses the -o parameter to specify what is the output of the compilation for the .wasm file. In our case, we are using calc.wat as a source and the command will produce a compiled file named calc.wasm.
ClojureScript Glue
Most of the online tutorials focus on the usage of WASM for JavaScript. But we are from the Clojure/Script world, so we will use our compiled wasm code in a simple ClojureScript project. For the next steps we will need to use Leiningen, we will recommend you to install this tool and follow the following instructions:
- Create a simple ClojureScript project: Use this command
lein new mies super-wasm-tutorial. This will create a skeleton project using the template mies inside a folder named super-wasm-tutorial.
2. Copy or move the wasm file to super-wasm-turorial folder.
3. Add the following code to the super-wasm-tutorial.core namespace:
(ns super-wasm-tutorial.core
  (:require [clojure.browser.repl :as repl]))

;(defonce conn
;  (repl/connect "http://localhost:9000/repl"))

(enable-console-print!)

(.then (. js/WebAssembly instantiateStreaming (js/fetch "calc.wasm"))
       (fn [obj] (js/console.log (obj/instance.exports.add 1 2))))
4. Use the command scripts/build to build the project.
5. Run a web server in the super-wasm-tutorial folder to serve to a port. For this tutorial, we used python3 -m http.server that will serve for requests at http://localhost:8000.
6. Open a browser and go to http://localhost:8000 or the port you have configured and use the browser’s console to see the result. If everything is ok, you will see a number 3 printed on the console.
Congratulations! Your ClojureScript application is using a compiled *.wasm file to run WASM.
Conclusion
In this article, we talked about WebAssembly and explored the basic concepts and pillars of this amazing technology. We also created a simple function to add two integers using WAT and we used the wasm file with a ClojureScript project. In the next part of this series of articles, we will create a more complex application using Rust and will compile the program to WASM.
Happy Hacking!


